Showing posts with label scenery. Show all posts

Tuesday, January 10, 2023

Modeling another "plaza" in blender, using a 2D base from AutoCAD.


There is already a post abouthow to model a square from a base imported from autocad, you can read it in Modeling a "plaza" in blender, using a 2D base from AutoCAD. , here you will see the same principles, but more "direct to the point":


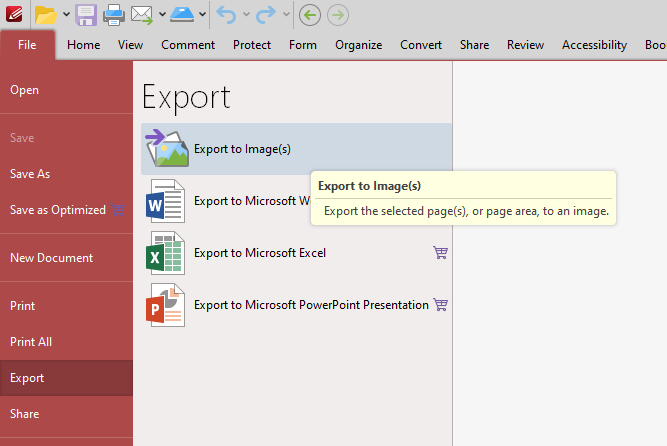
1 - Using PDF X-change editor: Open the PDF file you just exported from Autocad, export the file to image format (JPG). The default settings are enough for this task. Or you can use any pdf viewer to do the same thing.


2 - import in blender


3 - use the measurement tool to check if the measurement is "close "to the drawing (scale), otherwise you must scale the image with the scale command. make a calculation, 17 is the scale factor to be used.


Source: Blender


4 - The scale command is being used here on the image.


5 - I created a folder called 'reference' and unchecked the selection so I can draw over the image, plus I changed the opacity to 0.5 , which helps with visibility.


6 - create a vertex change viewport shading to xray , and pull lines to create the outline of the square,through the extrude command.


7 - I recommend using the knife command to cut the plane into vertices, then edit the heights of each point group.


8 - with your knowledge about architecture, you will lift shapes, make solids. I can't help you on this point, otherwise I would have to write a lot to explain. moreover, basic colors can help identify textures in the not too distant future. The "rest" is self explanatory.
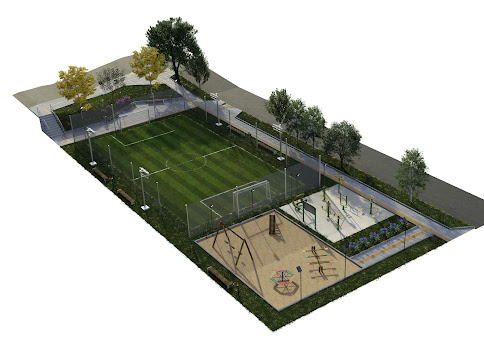


End result:


Tuesday, June 1, 2021

Medieval Scenery : Update 2 : Lighthing and some changes (before/after)


This is a medieval scenario that I created using blender, based on an image from the game age of empires 2. I am showing the before/after I dealt with lighting in a better way. 

The project can be seen here: https://www.artstation.com/artwork/Xn6Gal


Object work in progress: https://sngnwip.blogspot.com/2021/04/medieval-scenery-update-1-remodeling.html


Reference image:


How it was done? I will post someday.


Here's the before/after progress:

Monday, May 10, 2021

Wednesday, April 14, 2021

Medieval Scenery : Update 1 : Remodeling objects (before/after)


These are objects modeled in blender for a medieval scenery that I've created, based on an image from the game age of empires 2

I am showing the before/after I dealt with lighting in a better way. 

The project can be seen here: https://www.artstation.com/artwork/J96kyA

Medieval scenery can be seen here:  https://www.artstation.com/artwork/J96kyA


or here in this blog:  https://sngnwip.blogspot.com/search/label/medieval


OBJECT 01: Torch


AFTER


BEFORE


OBJECT 02: Shield


AFTER


BEFORE


Sunday, March 14, 2021

Modeling a "plaza" in blender, using a 2D base from AutoCAD - Pt2


1) Some UV mapping


2) Some chosen textures, according to the situation. 
Hint: Concrete paving //  Source: CC0Textures


3) Testing the trees. Also, dealing with 'leafs textures' or
something similar (low poly trees imported from 3d warehouse).
( I'm also using botaniq's lite version, but in this case, I could
not find the trees / flowers I really wanted. )


Now, changing the basic colors into materials.


Finished adding the flower and grass stuff. 


Now, adding objects such as trash can, park bench, tactile
paving, 'monuments'... The "trick" to make a path so the
tactile paving can follow is:

A) Draw the path using a curve.              
B) Set curve name to "Follow me"           
C) Set its origin --> "origin to geometry"


C) Create a plane.                 
D) rename it to "follow plane"
E) Set "origin to geometry"   


Still, with the plane selected:

F) add an array modifier. The count will be different 
according to your curve's length.

G) add a curve modifier, set curve object to "follow me"


H) Goto object properties, enable face instancing.
later you can disable the show instance settings.

I) This is intended to create a curve modifier WITHOUT deforming
the object. First, see if your number of array objects is okay, then...
(can you see the plane being repeated? at this point I think you
already know how to use the array modifier, I won't go into details)


J) create a tactile paving "mesh".   
K) again, set "origin to geometry"   


L) Select the "follow me" path.      
M) Cursor to selected                   
N) Select your tactile paving mesh
O) Selection to cursor                  


Now follow this order, it's important:
P) Select none                                 
Q) Select your tactile paving mesh     
R) Then, select the follow plane mesh
S) Set parent to object.                    


T) If done right, you'll see something strange as this:


U) you can disable  the instancing faces
 in viewport / render like I said before.


V) It works? Yes. It's boring? Yes. But works.


General overview... You can bet I used a lot of curves
and modifiers here and there..


Where's the tactile paving? Shit...


At least here is okay...


4) One or another new thing I learned here,
 I'm just showing the progress...
The final result can be seen in my Behance portfolio


A more detailed "1-2-3" about another scenery created
that I really liked can be seen here.